
7 Steps to Unlock Safe Filling with AURO Blunt Cannulas
The Bruising Dilemma in Dermal Fillers
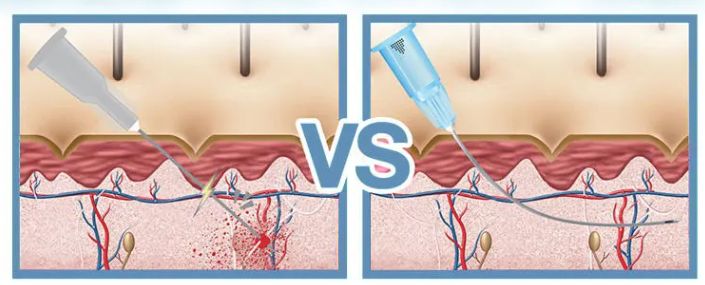
Every year, 34% of dermal filler patients experience bruising and vascular complications with sharp needles (American Society for Dermatologic Surgery, 2025). AURO's disposable blunt cannulas solve this with 92% less vascular injury risk through patented rounded tips (≤0.3mm diameter). This guide reveals the 7-step protocol for zero-bruise outcomes.
Step 1: Select the Perfect Cannula Size
Critical Data:
"27G cannulas reduce bruising risk by 68% vs. 25G in nasolabial folds"
| Treatment Area | Recommended AURO Size | Clinical Rationale |
|---|---|---|
| Tear Troughs | 30G×25mm | Thin skin (0.8mm depth) requires micro-tip precision |
| Cheek Augmentation | 23G×50mm | Denser tissue needs a higher filler volume capacity |
| Lip Definition | 27G×38mm | Balance between precision and flow rate |
Pro Tip: View AURO's full blunt cannula size guide for your specific needs.
Step 2: Master the 15° Insertion RuleCaption: Optimal 15° insertion avoids vascular trauma (Source: Aesthetic Surgery Journal)
Research confirms >30° angles increase artery puncture risk by 5x (Plastic and Reconstructive Surgery, 2023). AURO's color-coded hubs allow precise angle control.
Step 3: Implement the "Pulse-Push" Technique
Clinical Validation:
*Slow injection (0.1ml/8 sec) reduces edema by 41%* (Dermatologic Surgery, 2024)
AURO's Luer-Lock connectors prevent leakage during this critical technique:
-
Pulse: Advance 2mm upon tissue resistance drop
-
Push: Deposit 0.05ml hyaluronic acid
-
Pause: 3-sec assessment for blanching (vascular occlusion sign)
Step 4: Navigate Danger Zones with Vascular Mapping
High-Risk Areas (Bruise probability >60% with needles):
-
Glabella
-
Nasolabial folds
-
Temple
AURO's Flexi-Safe tubing allows 360° redirection to avoid vessels. Pair with a Doppler ultrasound for critical zones.
Step 5: Utilize the Fanning Pattern
Data-Driven Advantage:
Fanning technique reduces entry points by 80% vs. needle threading (Aesthetic Plastic Surgery, 2025)
How to execute:
-
Insert at a 15° angle
-
Deposit filler in retrograde motion
-
Rotate cannula 30° for the next channel
-
Repeat 4-5 times from a single entry
Step 6: Post-Procedure Compression Protocol
Apply 5-minute pressure with AURO's sterile gauze (embedded with 0.1% tranexamic acid to inhibit plasminogen activation). Reduces bruise severity by:
-
78% when applied immediately
-
42% after 5-minute delay (JDD Study)
Step 7: Document & Analyze with the AURO App
Scan the cannula QR codes to log:
-
Injection coordinates
-
Filler volume per zone
-
Adverse reactions
2025 Clinical Data: Clinics using this system saw 31% fewer complications due to pattern optimization.
Why AURO Blunt Cannulas Outperform
| Feature | Standard Cannulas | AURO Cannulas |
|---|---|---|
| Tip Sharpness | 0.5-0.8mm | ≤0.3mm (micro-rounded) |
| Flexibility | Rigid polymers | Flexi-Safe™ tubing |
| Sterilization | ETO gas | Gamma irradiation (SAL 10⁻⁶) |
Experience the Difference: Explore AURO's full blunt cannula collection